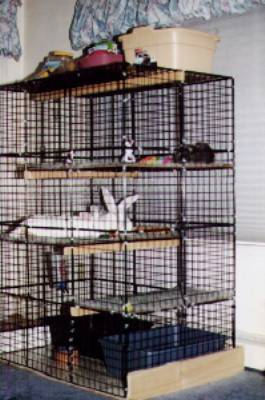
Building a NIC Condo
When looking into housing options for our rabbits, we weren’t able to find something that fit our needs. This lead us to investigate building our own. We heard of NIC condos and decided we would build one. NIC stands for Neat Idea Cubes and are sold by Fellowes. They are the wire frames used to build crate like cubes commonly used in dorm rooms or by a teenager. These wire frames are sold under other names too and are the basic building blocks for creating our rabbit condo. Stores such as Staples, Wal-mart and Sams Club carry them.
The effort was a little time consuming, but not overly difficult. Condos are easily customized. The two main supplies are the wire frames and plastic electrical ties (or “tie wraps”) to hold them together. You will also need latches to hold the doors shut. Snap shackles or 1 1/4″ binder clips work well. For shelves, we used pegboard covered with indoor/outdoor carpet placed on top of the wire frames with some wood underneath to provide extra support.
Instead of using the wire for the bottom of the condo, we built a wood base and covered it with linoleum. The assembled wire condo frame can be seated on the wooden base, within a wood rim.
First you need to figure out the dimensions of your condo. The wire frames are 14″x14″ and most condos are 2 frames deep, 3 frames wide and 3 frames tall. We had extra supplies and vertical space wasn’t an issue, so we chose to make ours one layer taller. Shelves are used to jump to different levels in the condo and my rabbits prefer them to ramps. The first shelf is smaller, only one frame wide by 2 frames deep. Additional shelves are 2 frames wide by 2 frames deep. We used 6 wire frames for the roof, while some people prefer to create a wood top. Traditional size with roof, one small shelf and one regular shelf requires 42 frames. Our larger size with one more layer in height and one more shelf used 56 frames.
Most of the wire frames come in boxes which also contain connectors. We never tried them as we heard that they were not sturdy enough. Common consensus is to tie your frames together using electrical ties. We laid out the sides of our condo and tied them together. We also created our shelves. This was time consuming, but not difficult. When you first start assembling the entire structure seems wobbly; however it really firms up once you have it together. Don’t worry about doors right now as you can always just snip ties to create one or add ties to take one away. When you get your walls created you will start to tie the walls together. Before you tie all the walls together, you need to put the shelves in. This can be tricky as the framework doesn’t have much stability yet and may require two people; one to hold and one to tie. We placed the lower shelf at the top of the lowest wire frame, at 14″. The larger shelf we put on the opposite side, 2 grids below the top of the second wire frame, at 24″. Once we had the shelves in place we placed the pegboard on top. You can always place the shelves where they make sense for your rabbits.
When the walls were all tied together, we added some wood beneath the shelves to provide extra support. Some people purchase dowels. We found regular wood to be cheaper and the buns love to chew on it! Just measure to fit inside the wire frame holes. We cut them 29″ so that they just stuck out past the edge. If you have litter box-trained rabbits and you aren’t worried about your floor, you don’t even need to build a bottom floor for your condo. We decided to take some plywood, put sides around it to keep hay, etc., inside, and then covered it with linoleum. If I had to do it over again, I would place the walls inside the wire frame as this would make it easier to clean.
Here are links to other sites with information about NIC Condos:
http://members.tripod.com/~sbonanno/NICages.html
by Suzanne Trayhan
Neat Ideas Cubes is trademarked by Fellowes

